Temperature is the invisible variable in fermentation. It controls how fast bacteria multiply, how quickly flavours develop, and whether your ferment produces something delicious or something that tastes like a science experiment gone wrong. Most guides mention "room temperature" as if that is a fixed number. In reality, room temperature in a British kitchen in January might be 15 degrees Celsius, while the same kitchen in July might be 28 degrees. That is a massive range for fermentation, and the results will differ accordingly.
For casual fermentation (sauerkraut, kimchi, basic pickles), temperature fluctuations are manageable. The ferment takes a bit longer in cold weather and moves faster in warm weather. But for ferments with narrower optimal ranges, like kombucha (24 to 29 degrees Celsius), yogurt (42 to 46 degrees), or tempeh (30 to 32 degrees), controlling the temperature is the difference between success and failure.
Heating mats: the simplest solution
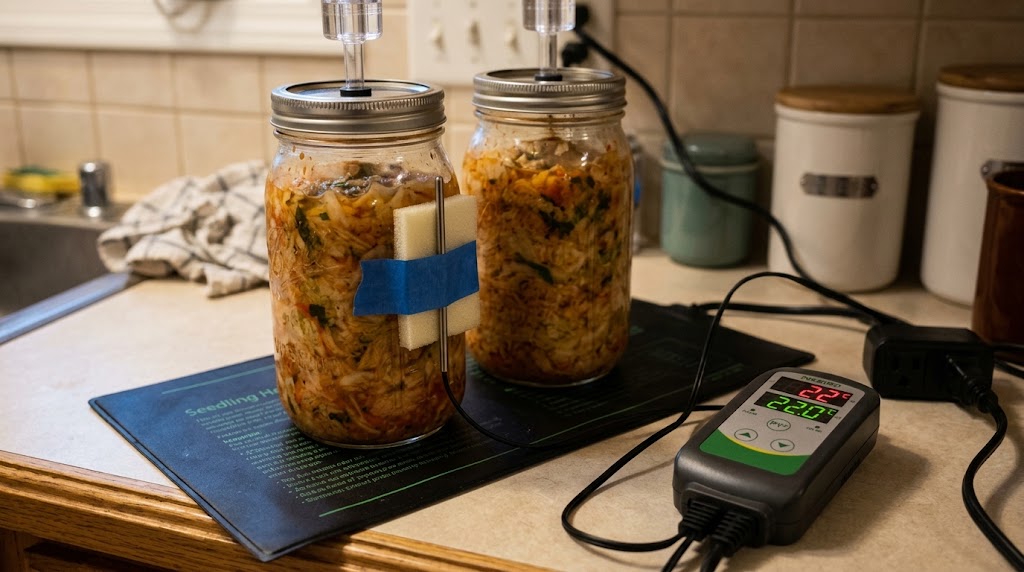
A seedling heating mat is the most popular temperature control tool in the home fermentation community, borrowed directly from gardening. These flexible mats sit underneath a jar or container and radiate gentle heat upward. They typically raise the temperature 5 to 10 degrees Celsius above ambient, which is enough to keep a ferment in range during cooler months.
The Vivosun seedling heat mat is the standard recommendation. It is waterproof, sized to hold several jars, and costs very little. Without a thermostat, it simply runs at a fixed wattage, so the temperature it produces depends on ambient conditions. Pairing it with a thermostat controller gives you precise control.
Thermostat controllers: precision without complexity
A thermostat controller plugs between the heating mat and the wall outlet. A temperature probe goes into or against the fermentation vessel. You set a target temperature, and the controller cycles the mat on and off to maintain it. This turns a simple heating mat into a genuinely precise temperature control system.
The Inkbird ITC-308 thermostat controller is the default choice. It has a dual-mode output: one outlet for heating (your mat) and one for cooling (a small fan or, in extreme cases, a mini fridge). For most home fermentation, you only use the heating outlet. The probe is accurate to about 0.5 degrees Celsius, and the display shows both the target and actual temperature.
The combination of a Vivosun mat and an Inkbird controller costs under $40 total and handles temperature control for every common home fermentation project. It is the single best value upgrade for fermentation consistency.
Thermometers: knowing what you have before you control it
Before investing in heating equipment, a simple thermometer tells you whether you actually need it. An adhesive strip thermometer stuck to the outside of your fermentation jar gives a rough reading. A digital probe thermometer gives an accurate one.
The ThermoPro TP03 instant-read thermometer is inexpensive, fast, and accurate enough for fermentation work. Dip it into the brine, read the temperature, and adjust your setup accordingly. For ongoing monitoring without opening the vessel, the Inkbird controller's probe taped to the outside of the jar (insulated with a small piece of foam or cloth) gives continuous readings.
Insulation: free temperature control
Before buying a heating mat, consider insulation. A fermentation jar wrapped in a towel and placed in a cupboard or closet maintains a more stable temperature than one sitting exposed on a countertop. The jar's own fermentation activity generates a small amount of heat, and insulation retains it.
A cooler box (the kind used for picnics) works as a simple fermentation chamber. Place your jars inside, optionally with a jar of warm water to raise the temperature a few degrees, and close the lid. The insulation dampens temperature swings from day to night. Some home brewers use a cooler box with a heating mat on a thermostat inside it as a budget fermentation chamber that holds temperature within 1 to 2 degrees of the target.
Cooling: the summer problem
Most fermentation guides focus on heating because most fermenters live in climates where indoor temperatures drop below optimal in winter. But summer heat is equally problematic. Sauerkraut fermented above 24 degrees Celsius tends to develop off-flavours and soften too quickly. Kombucha above 32 degrees ferments so fast it turns to vinegar before you catch it.
Options for cooling:
- Evaporative cooling: Wrap the jar in a damp cloth. As the water evaporates, it pulls heat away. This can lower the temperature 3 to 5 degrees below ambient. Effective in dry climates, less so in humid ones.
- Cold water bath: Place the fermentation vessel in a shallow pan of cold water. Add ice packs or frozen water bottles to lower the temperature further. This requires attention but works well for short fermentation periods.
- Dedicated mini fridge: For serious temperature control across many ferments, a small dorm-style fridge with the Inkbird controller's cooling outlet provides true set-and-forget temperature management. The controller cycles the fridge on and off to maintain the target temperature. This is the professional-level solution.
Temperature ranges by ferment
A quick reference for common fermentation projects:
- Sauerkraut: 18 to 22 degrees Celsius. Slower ferments at the lower end produce better flavour.
- Kimchi: 18 to 22 degrees for initial ferment, then refrigerate. Higher temperatures (24+) produce very sour kimchi quickly.
- Kombucha: 24 to 29 degrees. Below 20, the SCOBY goes dormant. Above 32, vinegar bacteria dominate.
- Yogurt: 42 to 46 degrees. Requires active heating (an oven with the light on, a yogurt maker, or a heating mat on high).
- Tempeh: 30 to 32 degrees. Very narrow range. A dedicated fermentation chamber is almost essential.
- Hot sauce: 20 to 25 degrees. Forgiving range, similar to sauerkraut.
- Milk kefir: 18 to 24 degrees. Faster at the warm end, thicker at the cool end.
- Water kefir: 20 to 26 degrees. Similar tolerance to milk kefir.
FAQ
Does fermentation stop in the fridge?
It slows dramatically but does not stop completely. Fridge temperatures (2 to 5 degrees Celsius) reduce bacterial activity to a crawl. Sauerkraut, kimchi, and other lacto-fermented foods continue to develop flavour very slowly in the fridge, which is why aged kimchi tastes different from fresh kimchi. Kefir grains can survive in the fridge for a week or two between feedings.
Can I ferment in a warm oven?
An oven with only the light on typically holds 26 to 32 degrees Celsius, depending on the oven. This works for kombucha and yogurt. Check with a thermometer first, because some oven lights run hotter than expected. The risk is forgetting the ferment is in there and turning the oven on for cooking.
My ferment is bubbling too fast. Is the temperature too high?
Probably. Rapid bubbling indicates aggressive fermentation, which can produce off-flavours and deplete sugars before complex flavours develop. Move the ferment to a cooler location and taste it. If it still tastes good, you caught it in time.
As an Amazon Associate, I earn from qualifying purchases. Product links on this page may earn Culture & Crumb a small commission at no extra cost to you.